Wednesday, August 31, 2016

Images as Answer Choices? Forms just got even more awesome for K-2!


Have you seen the update to Google Forms that allows images be answer options? A few weeks back, I posted a blog about K-2 Google Forms. But this update makes using Forms with young students even easier!


For years, when I have shared Google Forms to Primary teachers, one of their first questions has been, "Can we use an image as the answer choice?"

Many Kinder students don't start the year as readers! Before this week, we could only use TEXT as our answer options. This made using forms with our littlest learners a bit of a challenge. 

Look at this sample:


One way I had made Forms more accessible for our youngest students was by creating a labeled image in Google Drawings and then putting it at the top of the form. This still required students to match the label to a TEXT answer option. While this often made Forms a little easier for Kindergarteners, it did take extra steps and TIME when creating the Form.

This update makes creating K-2 friendly forms SO EASY!


Hover over your answer option, and an image icon will appear on the right.

You can then upload an image from your computer, take a snapshot, or search images right there in the form.


I can't wait to see what K-2 teachers do with this! Make sure you post and share! 

Want to try it out yourself? Click here! 

And here are a few additional resources on Using Google Forms:


Tuesday, August 30, 2016

Digital Listening Stations in K-2!

Listening skills need to be developed in our littlest learners! 

Like many topics in the Primary grades, listening comprehension skills need to be explicitly modeled and taught.  We sometimes assume that K-2 kids know how to listen, but they don't always know how to listen actively and retain what they have heard! Our young students especially need to be trained with those skills for active listening and comprehension, such as making predictions and making text to text or text to self connections. Most teachers model these things while reading aloud with students:  
"I wonder why the character did that..."
"That reminds me of a time when I..."

And after hearing this modeled, students need practice doing this on their own! We need to offer them exposure to a wide variety of texts read aloud to have them practice those essential listening comprehension skills. 

While we want to read every wonderful picture book to our kids every day, sometimes there just isn't time to get to them all. And sometimes, you might want to read a particular book on a certain day, but you manage to misplace your copy. 

No worries! We have options! There are some great FREE online resources for digital read-alouds that let your students listen to the texts! And since they are online, won't get lost in your bookshelves!

Justbooksreadaloud.com is a website that has curated a thorough collection of YouTube read-alouds some of the most popular picture pics. They are searchable and sortable by author and topic. Most of these are made by teachers. 


Storylineonline.net also has a collection of popular stories! They are read aloud by celebrity members of the Screen Actors Guild.


So how does this look in the K-2 classroom?

Differentiated Guided Reading groups are so important in the Primary grades. But one of the biggest concerns K-2 teachers have is, "But how do I manage the rest of the kids while I work with small groups?!?" 

Running effective and engaging literacy centers is certainly an art. Especially with little learners, you need to have clear and consistent classroom management routines in place. The literacy activities need to be adequately challenging (not just busy work!), but should also be something that the students can work on without a lot of teacher guidance. 

During my 14 years as a teacher of primary-aged students, Listening Stations were one of my go-to activities during Guided Reading and literacy centers. Students would sit in a group, and everyone would plug bulky headsets into a big, bulky block. Someone would push PLAY on the cassette and then they could all listen and follow along.

Now we can use our digital read-alouds and give students access to listen to so many wonderful pieces of literature! And as a bonus, since they are being accessed digitally, There is no need to rewind a cassette tape between groups. Did I just date myself?

Students can gain access to these titles through a link in Google Classroom. Another option might be to have little ones scan a QR code on an iPad or other mobile device. If you're worried about sending little ones to YouTube because of the sometimes terrifying comments or suggested videos, try using ViewPure to clean up YouTube and make it more friendly for littlest learners.   

If you don't have a device for every student, here's a quick and inexpensive way to use just one desktop, laptop, or tablet and turn it into a listening station for an entire group. 


This splitter takes the single headphone input on a device and allows five students to listen to the story together. There are a wide variety of these available on Amazon, ranging in cost from about $6-$12.

How do you know they are listening?

When I used Listening Stations in the classroom, sometimes the students would simply listen to the story and then move on. Other days, I used a Listening Station response page that the students were to fill out when the tape was over. I created this form when I first began teaching, and duplicated it over and over again. I must have made at least 8,000 of these sheets during my classroom days! 


These days, in order to have students show some kind of accountability, teachers sometimes use commercial online programs to have the students check their comprehension after reading or hearing a story. These programs offer a multiple choice quiz full of recall/DOK Level One questions. While designed to motivate readers, these programs sometimes have the unfortunate secondary effect of squashing the joy of books out of our kids. 

What if we offered them something else?

What if students had better options? Modern tools allow for so much personalization and creativity! Here are some fun Google Goodies and more that can be used for accountability and extension after a Listening Station:

Listening Station response on Google form - Automate it! Save time and paper!


TK Story Elements activity with Google Slides (Credit: Amanda Ibal)
Little learners can watch or listen to a digital read-aloud many ways! This set of Google Slides has the video embedded right into the slide, where it can be played. Using this method, the little ones get the YouTube content without actually visiting the YouTube website (and all of the scary elements we mentioned earlier!)


Time Magazine Reading Summary made with Google Drawings. 2nd Grade students listened to a text about Barack Obama and recalled key details to create their Magazine cover. This works really well with non-fiction and biographies, but what if they made a cover for a character in a piece of literature? (Inspiration: Ryan O'Donnell)  


Here's a Blank Template of the Magazine cover you can use with your students! Open it and then Click File>Make a Copy.

Amazon-Style Book Listing and Review on Google Slides: (Inspiration: Ashley Ochoa) 
After listening to a text, students can write an amazon-style review!


Story Summary with MyMaps (Inspiration: Will Kimbley) Students can retell a story using location! In this book, a girl flies around the world to gather ingredients to make an apple pie. Students place a pin where she stops and lists the ingredient she finds there.


Google Form with embedded video (Credit: Jon Corippo and Marlena Hebern) Going further with Google Forms, we can also embed YouTube videos right into a Form! This is yet another option for avoiding some of the inappropriate comments and suggested videos that show up directly on the YouTube website.  After listening to the video, you can use Form items to ask little ones to tell their favorite part, answer comprehension questions, or have them describe story elements such settings or characters.


Reading Rainbow style book talks on Screencastify or green-screened with DoInk (Credit: Anne Kozma) After hearing a story, have students write scripts and record book talks!


You can also record and create your own read-alouds using the camera on your phone, tablet, iPad or with Screencastify on a Chromebook. This allows you to ask students your own questions throughout the read-aloud while modeling think-aloud comprehension strategies, too! These videos can be uploaded to YouTube or Google Drive for sharing with students.

If you want to try a tool that embeds additional listening engagement, consider checking out EdPuzzle for your Digital Listening Station! This tool lets students listen to the texts, but can also automatically pause the video periodically to show embedded questions, play voice comments, or ask for other types of responses from the students. 

I hope you can see that the creative possibilities are endless! Pick one thing and try it! SHARE how it goes!


Give them options!

Books are so fun. Don't forget to let your students have plenty of CHOICE in what they read or listen to! One added benefit of having students listening to the stories is that they have access to texts that might be outside of their own reading ability. Let them listen to stories to build a love of literature, which can motivate them to want to read more. 

Using Digital Listening stations, we can offer our students a wider selection of books to read or hear even when visiting a library to get an actual book isn't always an option. We can also let our non-readers and language learners hear stories being read by fluent models. Some parents may have internet, but don't have the means to provide a large library of books in their home. Sharing these resources with them lets your young students also access these books from anywhere!

Friday, August 5, 2016

K-2 Google Forms!

What can our littlest learners do with Google Forms? There are so many options!

Forms are a great way to get primary students started with important technology skills such as text entry, check box questions, drop down menus, and submitting content. Even with our youngest students, Google Forms can be used for many purposeful tasks:
  • Formative Assessment
  • Exit Ticket
  • VOTE!
  • Question of the Day
  • Collect data
  • Crowdsource info for collaborative map or word cloud projects

One Kindergarten teacher I know has her students stop by a class iPad to fill out a “question of the day” in a Google Form. She uses a variety of item types and questions to gather interesting data. Later they debrief the answers and have conversations about the numbers. Because they helped generate the numbers, the kiddos are very invested in the results!

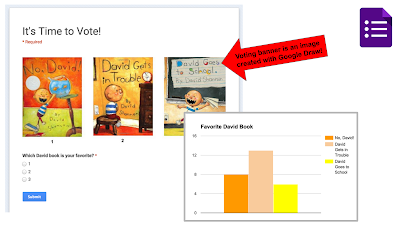
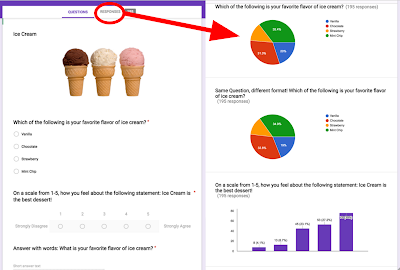
Here are a few samples of Google Forms for Primary-aged students.


In the newest version of Google Forms, colorful visual results are available in just a click!


Inserting an image adds a visual layer to a Google Form.


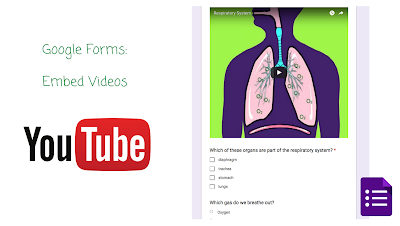
You can also embed YouTube videos into Google Forms. This gives our little ones access to the greatest YouTube content without sending them directly to YouTube! Some primary teachers find the “suggested videos” and comments make the YouTube site unsafe for K-2 students. Embedding the content allows the kids to watch the YouTube video right in the Form without actually visiting YouTube. Also, having the response questions for the video right on the page of the form allows students to rewatch it as needed while answering the questions.


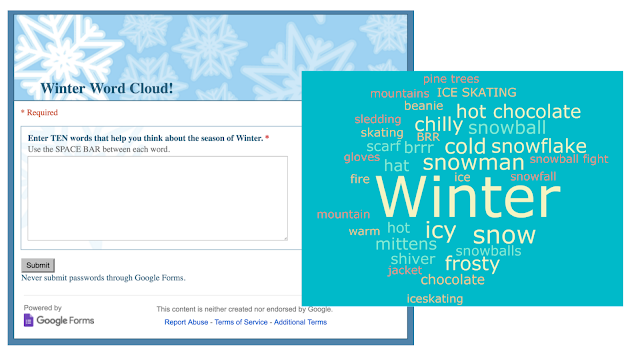
Google Forms can be used to crowdsource content for creative projects such as word clouds. Here, students each enter words that represent the Winter season. The Form results can be copied and pasted into a word cloud generator such as Wordle, Tagxedo, or the ABCYA Word Cloud activity.


And then, what if we let the students create the content?

Here’s a sample of a second grader who used Google Forms to collect data, and then used the results to make a bar graph in Google Sheets.


In his first iteration of this student-generated survey, the respondents had to type in the name of their favorite football team. He learned a few things from this experience. First, he realized that his friends couldn’t spell! So, even though ten students voted for the Raiders, they had a skewed visual representation of the data because they all spelled it differently. He revised his question to make it multiple choice and got a better graph.


Tips for little learners:
  • Keep it simple! Use just a few questions!
  • Use Pictures!
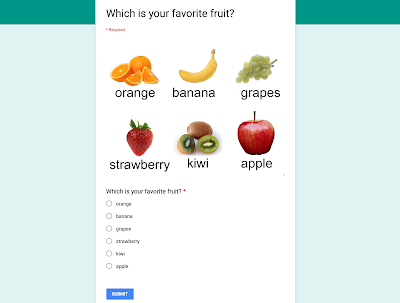
  • For non-readers, create an image using a tool, such as Google Draw, that includes  simple words or letter choices with pictures. They can then match the word on the image to their item choice. The fruit vote above is a great example of this.
One thing that makes Google Forms especially great for little ones is the fact that Forms are device agnostic. Forms work on any device with a web browser. That could be a Chromebook or laptop, an Android tablet, iPads, and even smartphones. One teacher I know has four recycled iPhones she uses as wifi-only devices so the students can fill out Google Forms. Students can use Google Forms on whatever device they have available in the classroom and also at home!

For more samples, see my presentation on Primarily Google: Google Forms


Here are some additional useful Google Forms resources:


Tuesday, August 2, 2016

Kindergarten Hyperdoc - My Five Senses

Check out this awesome Hyperdoc for Pre-K, TK, or Kindergarten!

During one of their early September ELA Units of Study, our Kindergartners will be studying the Five Senses. To blend some modern tools into their learning, one of the Kinder teachers created this awesome Google Slides Hyperdoc where students can extend their learning! 

On the cover page, little learners add their name. Even if the teacher is using Google Classroom (which automatically puts the student name on the file,) it's good for the students to have opportunities to practice typing their name. It's a skill they will use for their entire life, and it has to start somewhere!

On this ENGAGE page, students watch a YouTube video that has been embedded into the slide. Embedding YouTube videos into a slide helps keep our little learners away from the distractions such as the suggested videos and comments that often come along with YouTube content. The "watching eyes" clip art helps non-readers know they are going to watch something on this slide.
The next slide asks students to EXPLORE additional content about the Five Senses. The first is a read-aloud of the books My Five Senses by Aliki. It's a great simple text that describes the Five Senses in a way that your ones can easily comprehend. The bottom link sends students to articles about their five senses on a great K-2 friendly subscription search database we use called Pebble Go.


On the APPLY page, students select images that best represent the Five Senses into the five empty boxes. The skill of drag-and-drop is important! Little ones CAN do this, but they do need chances to practice, especially if they are just learning to use a touch pad on a laptop or Chromebook.
When we have the little ones do drag and drop activities, they sometimes accidentally drag the wrong content around and also accidentally delete the target boxes! To help keep this minimal, we first design the layout of the page and then take a screenshot of it. We then use that screenshot as the background of the slide. The only loose or moving parts on the slide now are the images across the bottom. 

The final slide asks the students to REFLECT on their learning. Their teacher has them use paper and crayons to draw a picture about something they feel is important to know about their five senses. Students who are ready may also include some words or even a sentence to describe their picture. The kiddos can then take a snapshot of their physical drawing and include it on the final page of the Hyperdoc.

An animated gif is included on the slide to remind the students of the steps for inserting a snapshot from their Chromebook.


These young kiddos need early and frequent exposure to the available classroom technology. Many teachers think they need to wait "until the kids are ready" to let them use the computers. But the truth is, the students show up on the very first day already READY! We need to teach and model the basics and then put the tools in their hands. 

This Hyperdoc will be one of the Kindergarteners' first assignments. The teacher will model and demonstrate each of the skills, including how to start a video and how to resize an image. The little ones may not start the year knowing how to do these things, but they catch on fast!

Find a View-Only copy of this Hyperdoc here. Please feel free to copy, use, share, and modify this! When you have it open, you can select File, and then Make a Copy, and you will have your own EDITABLE version of this great resource. Find it on Teachers Give Teachers soon!(@TsgiveTs) Enjoy! 

Credit for this goes to my good friend and longtime colleague, Jennifer Kubar. Also, Kelly Hilton designed the HyperSlides layout. Learn more about Hyperdocs at Hyperdocs.co.

Remember, our littlest learners are capable of amazing things if we put the tools in their hands. #K2CanToo!